
In this tutorial, we’ll show you how to make a cozy fleece blanket in a few simple steps, with absolutely no sewing involved. There are two versions – a tie-edge and a braided-edge blanket – so it’s up to you to choose which easy blanket you want to make!
What you’ll need
To make either version of this no-sew blanket, you’ll need:
- 1 1/2 yards of fleece
- Rotary cutter
- Cutting ruler
- Cutting mat
If you don’t have a rotary cutter and cutting ruler, you can use:
- Ruler
- Pen or pencil
- Scissors
How to make a no-sew fleece tie blanket: a step by step guide
A fleece blanket is perfect for keeping you warm on cold days or chilly evenings. It also is a great gift, or ideal for charity projects.
You don’t need to turn on a sewing machine or even a needle to make your own cozy fleece blanket. Follow the instructions below to make your very own no-sew tie blanket from just two pieces of fleece.
This easy project is inexpensive to make and is ideal for kids and teenagers.
Step 1: Measure and cut your fleece
Before you can start making your blanket, you’ll probably need to trim your fabric. Depending on the fleece you buy, you’ll most likely need to cut off the selvage edge, and you may need to trim it further in order to straighten the fabric.
Once you’ve trimmed your fabric as required, lay the first piece of your fleece out on your work surface. Unless you have a very large table, a large area of floor works best.
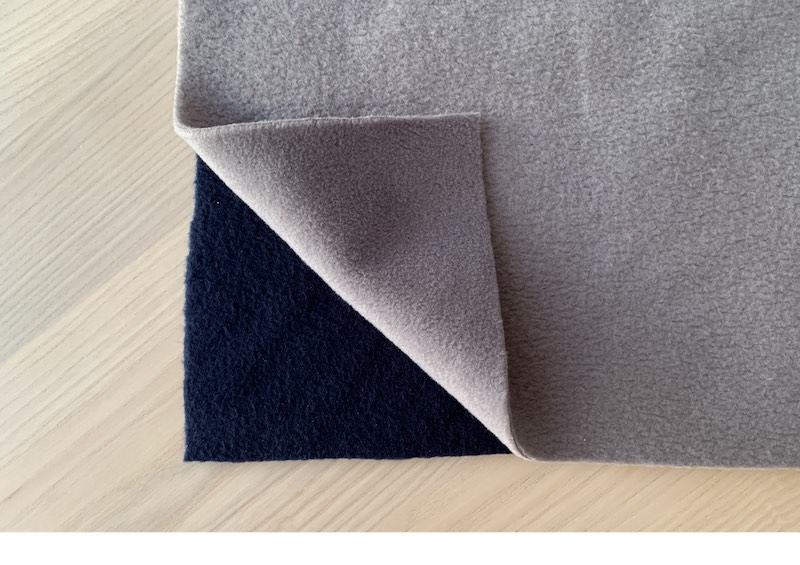
Start with the piece of fleece that will be the back of your fabric and lay this right side down. That is, the side that will be on the outside of the back of the blanket should be face down on the work surface.
We recommend you use anti-pill fleece: this will survive washes and constant use and still look as good as new!
You can either use the same fleece for the front and back of the blanket, or opt for different colors or prints for the two sides. For example, a bold color or print works well for the front of the blanket, but you want a neutral tone for the back.
Avoid using white or very light colors as these will show dirt super easily.
After smoothing out the first piece of fleece with your hands, lay the second piece on top, right side up. This will be the front of your blanket. As before, smooth the fleece with your hands so that it lies flat.
Cut the fabric to size, using sharp fabric scissors to cut through both pieces of fabric at the same time. Don’t worry too much if the cuts are not perfectly even, but you do want to keep them more or less straight.
For a small, lap-sized or baby blanket, use one and a half yards of fleece. You can make a larger blanket simply using large pieces of fabric: you need to cut your fabric 10 to 12 inches larger than you want the finished blanket to be.
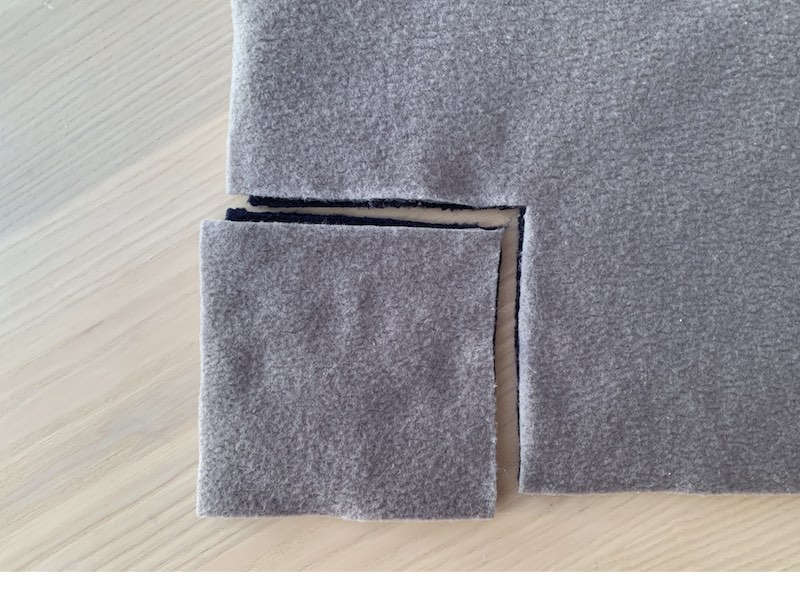
Step 2: Mark and cut the corners
The next step is to mark out the fringe that will go around the edge of your blanket. We recommend a fringe that is around six inches long, but you could have a fringe that is between four and eight inches, depending on your preference.
Measure a square the same length in each corner. So, in this case, we will measure a six-inch square in each corner of the blanket.
Take a rotary cutter, align the cutting ruler to the six-inch mark and cut out the square.
If you don’t have a rotary cutter you can use a pencil and scissors instead. Use the pencil to mark the lines of the square and then cut along the lines with scissors.
In either case, repeat this for each corner of the blanket, cutting through both layers of fabric. You should aim to cut as straight as possible, but it doesn’t matter if the lines aren’t perfectly straight as this won’t be noticeable when the blanket is tied together.

Step 3: Cut the fringe
Once you’ve cut out the blanket corners, you can start working on the fringe. Cut out the fringe along each edge, again cutting through both pieces of fleece at the same time.
Use your corner squares as a guide, take your rotary cutter and use the ruler to measure the length of the fringe to the same length as the corners.
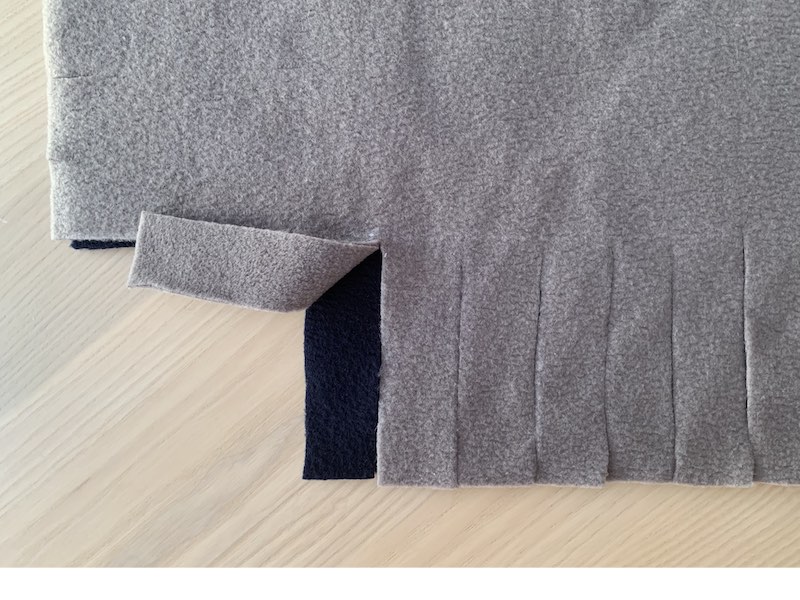
Work your way along the edge, cutting each piece at intervals of between one and two inches wide. This will be the width of your fringe, and we recommend two inches in width, but you can make it narrower if you prefer. Just make sure that you keep your cuts and the width of the fringe consistent.
If you’re using scissors, first measure and mark out all of your fringe lines in pencil, keeping it the same length as the corners. Once marked, cut along the marked lines with your scissors. Marking each line may seem tedious, but it will ensure your cuts are straight and even.
Work your way around each edge of the blanket, cutting out the fringe.
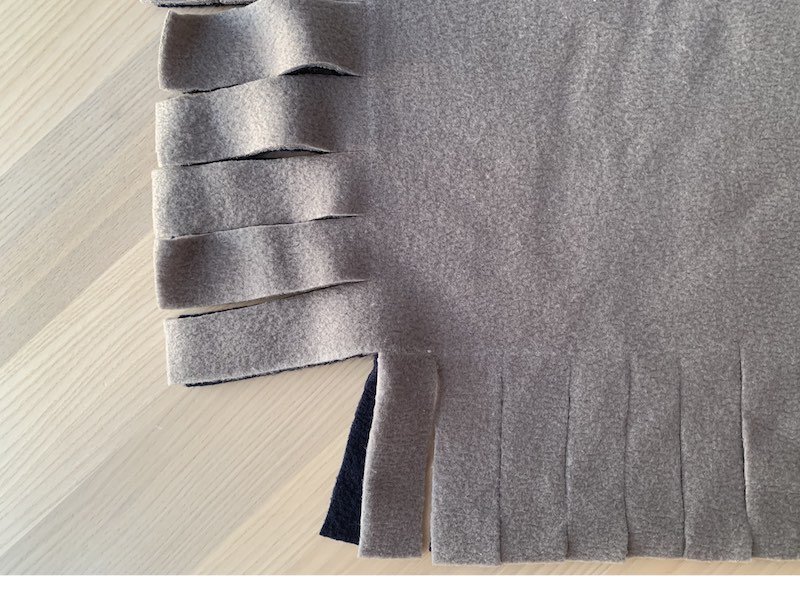
Be careful that the width of your fringe is even when you come to the end of each edge. When marking your lines or using a rotary cutter, you may have a nasty surprise when you reach the end of the row of the fringe and find that the width of the last piece is uneven.
To avoid this, calculate how much is left to mark or cut when you’re around 18 inches from the end. If your fringe widths are not going to fit evenly into this space, adjust the width accordingly.
For example, if you are cutting two-inch pieces of fringe, but measure you have 17 inches left, you should cut the remaining pieces at two and one-eight inch intervals. This will perfectly and evenly fit in the remaining space.
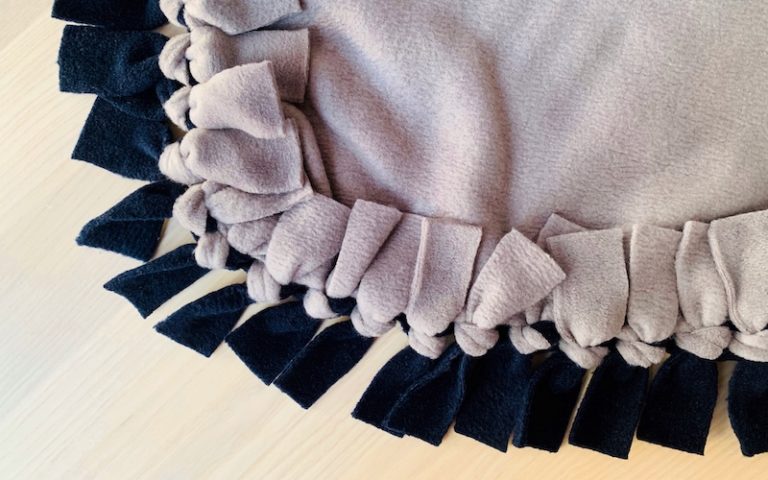
Step 4: Tie the Fringe
You now have two perfectly cut pieces of fleece with fringe around each edge. These will be the front and back of your blanket, but how are you going to keep these two sides together without sewing? This is where the tying comes in.
Tie the fringe together, tying the corresponding piece of fringe from the front and back piece of the fleece. Hold these two pieces of fringe together and tie a square knot.
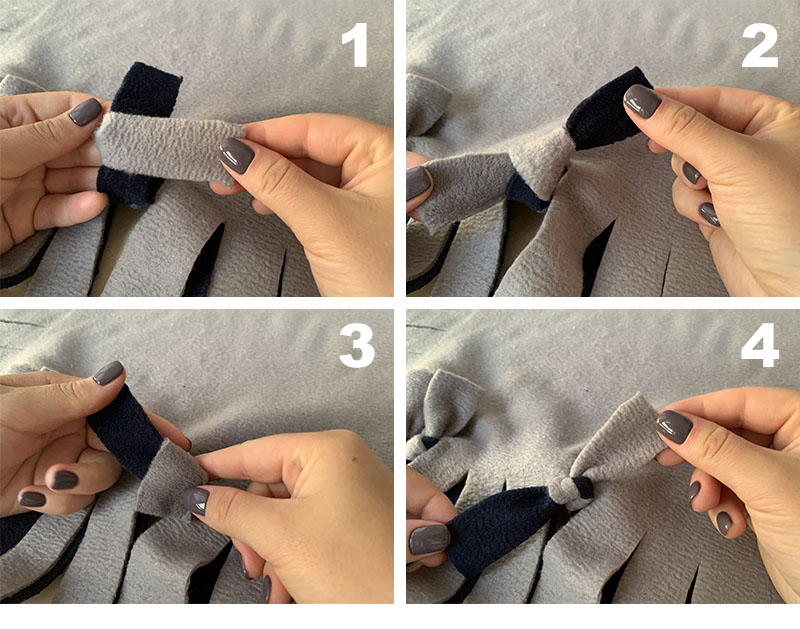
Each knot should be tied nice and tight, but without pulling on the fabric.
Step 5: Complete the fringe
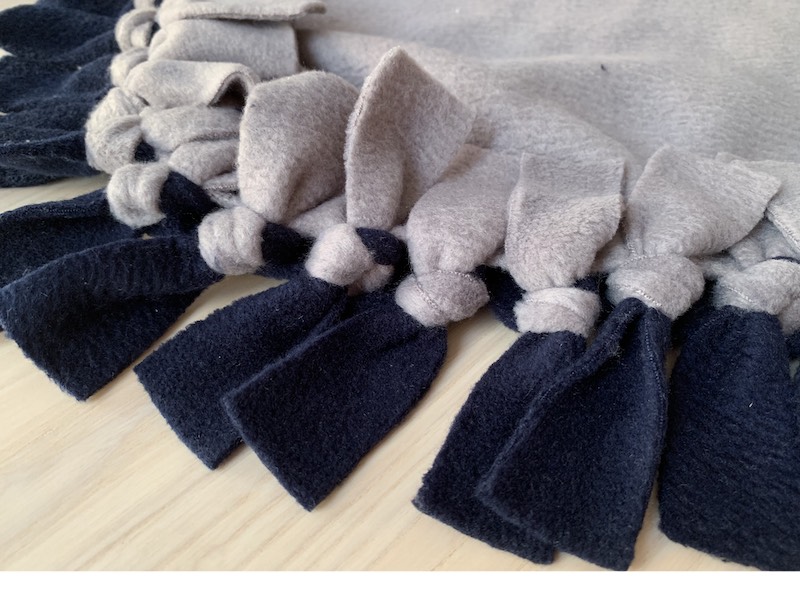
Continue the same process, tying each set of fringe until you have tied all the way around the edge of the blanket. You will have a cosy, neat tied fleece blanket without having sewn a single stitch!
Alternative: Braided edge fleece blanket
Another way to make a fleece blanket without sewing is to create a braided edge. Here are detailed step-by-step instructions to make this alternative no-sew fleece blanket.
Step 1: Mark and cut out the corners
As per the tied-edge version, you can use one and a half yards of fabric to make a small lap blanket, or create a larger blanket using fabric of larger dimensions.
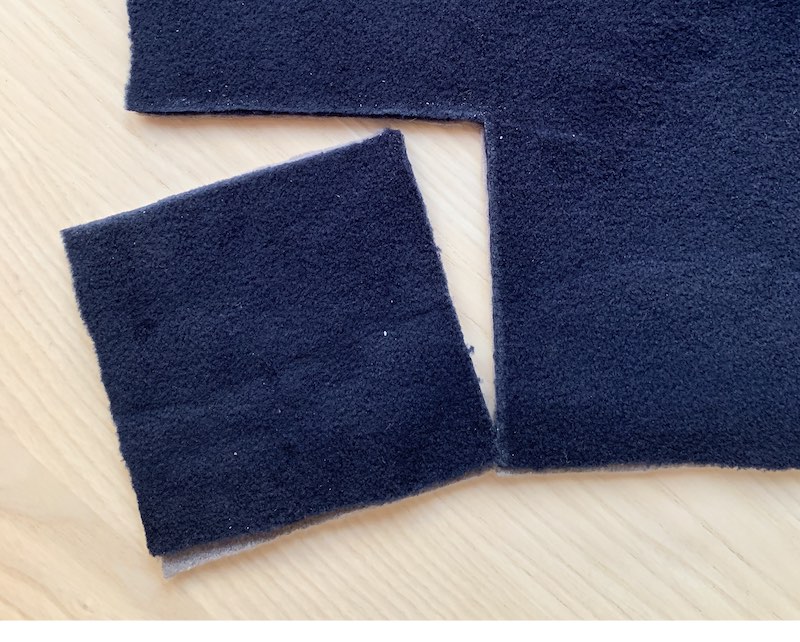
Follow steps one and two described above: laying out both sides of the blanket, marking out and cutting the corners. However, for this blanket, you should cut only a two by two inch square in each corner.
Step 2: Cut the fringe
Next, cut the fringe along the edge, again matching the length of the corners and cutting two inch lengths of fringe. For this kind of blanket, the fringe pieces should be one inch in length.
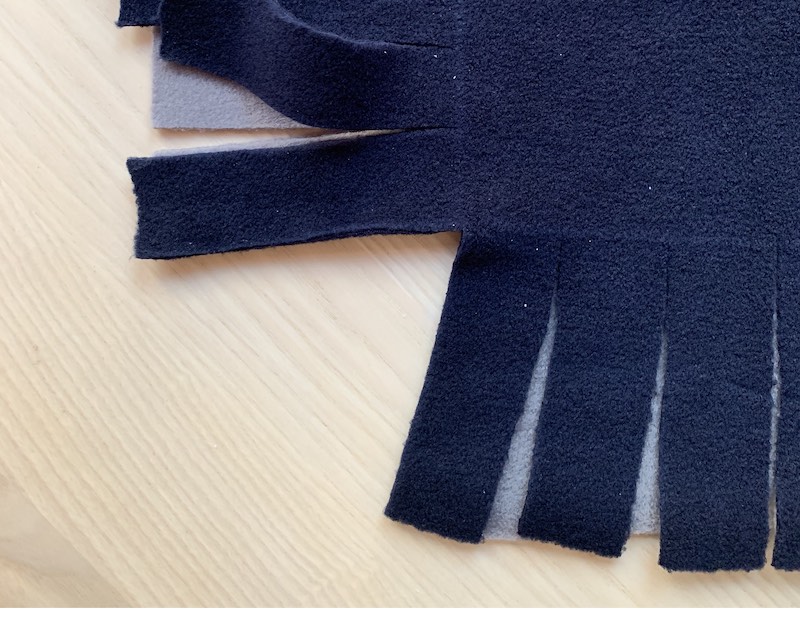
Otherwise, you can follow the same process as described in step three above and cut the fringe for all four sides of the blanket.
Step 3: Cut a slit in each fringe piece
Take each fringe piece and cut a small slit in the middle. The closer the slit is to the end of the tab, the tidier the edge of your blanket will be. However, this also makes it more difficult to manage and more likely to rip through.
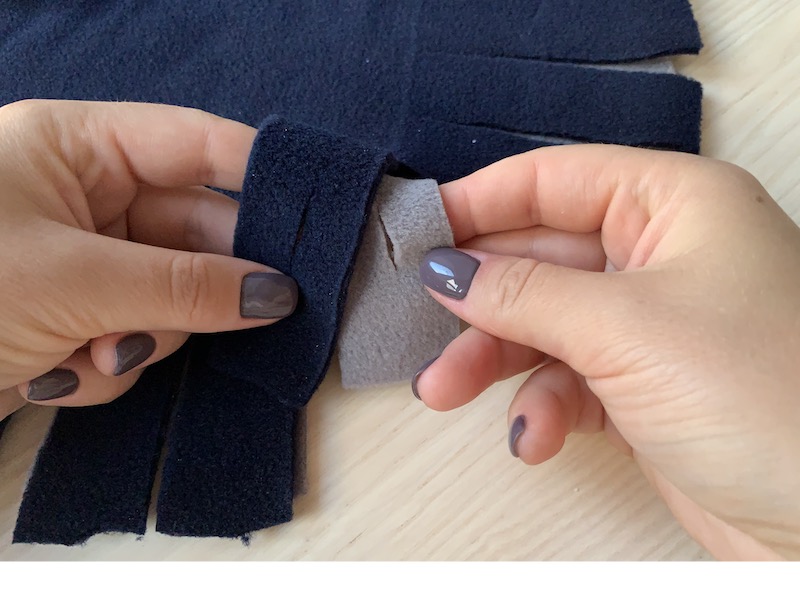
It is a good idea to practice cutting and braiding the fringe on some scraps of fabric first, and you will get an idea of the best place to make the slit.
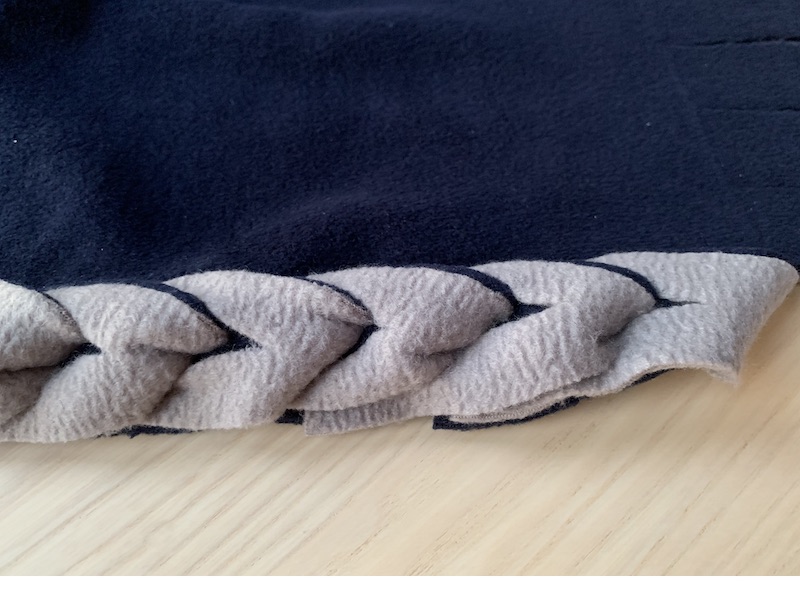
Step 4: Braid the edge
The next step is to “braid” along each edge of your blanket. In reality, this is less like braiding and more like crocheting.
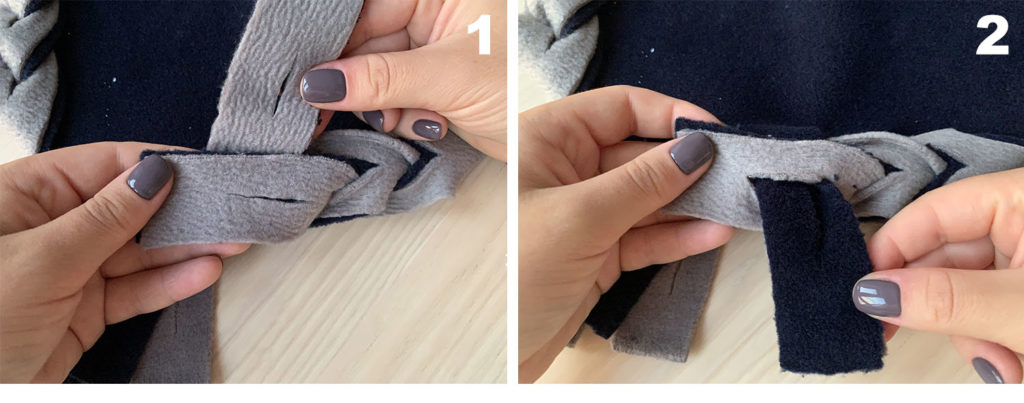
Starting at the left of one edge, take the first fringe piece and thread it through hole on the fringe piece directly to its right. Pull it all the way through and this will become the next hole that you use.
Repeat the same process pulling the next piece of fringe through the piece that you have just threaded.
As you work, always take both layers of fabric and work them as if they were one piece.
Step 5: Finish the edge
Once you reach the end of the edge, separate the front and back pieces of the last piece of fringe.
Put one of the layers through the starting hole and use the two pieces of fringe to tie a double knot.
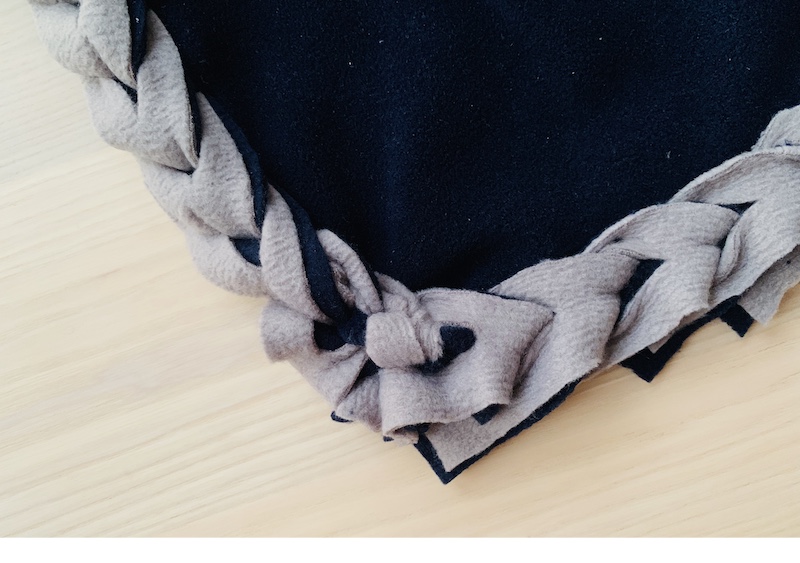
Tuck the fringe tails into the inside of the blanket so that they are hidden from view.
Repeat the same process for each side, so that the entire blanket has a braided edge. Once you’ve done that, your no-sew blanket with a braided edge is complete!
Final thoughts
So there you have it – two simple, no-sew ways to make a lovely fleece blanket. It’s up to you if you want to make a blanket with a tied or braided edge, both are equally quick and easy to make, and both create charming blankets.
We hope you’ll enjoy making your no-sew fleece blanket: please share this article with anyone you think will love making one too!