
Crochet charts are helpful, visual guides that make it easier and quicker to visualize and learn complex crochet patterns. However, they can be pretty confusing when you first start out with them.
In this guide, we will cover what each symbol means on a crochet chart and how to read them once they are put together.
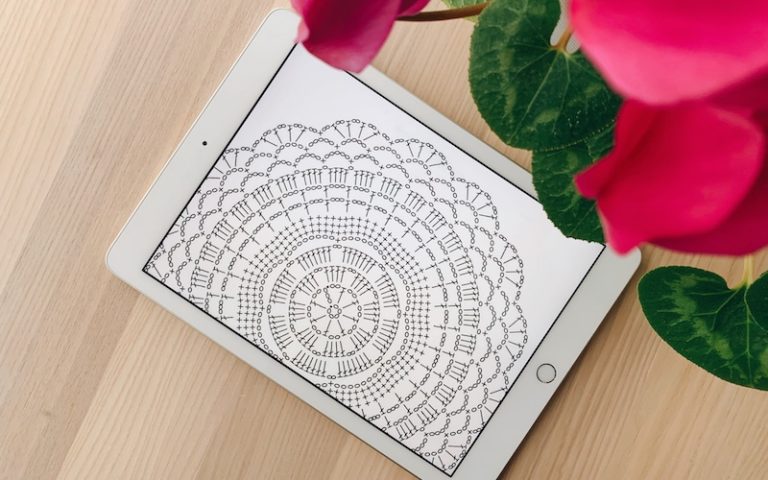
What is a crochet chart?
A crochet chart is a diagram that illustrates a specific crochet pattern. It uses different symbols to represent different stitches and shows exactly where each stitch should be placed.

Why should I learn to read crochet charts?
Crochet charts are useful for patterns that use a variety of different stitches or on patterns that are hard to explain with written instructions alone.
Lace patterns, for example, almost always come with a chart, since they tend to be more complex than your average crochet pattern. Being able to visualize the stitches and their order in the pattern makes it easier to follow along as you are crocheting.
Crochet charts also erase any possible ambiguity in a pattern.
The US and UK use different terminology for crochet tools, stitches, and techniques. A chart ensures there won’t be any confusion between which stitches or techniques are needed in the pattern.
Crochet charts are not meant to replace written instructions completely. They simply add an extra element to ensure that the intended user has the best understanding of the pattern as possible.
Even with a chart, you should also refer to the written instructions when setting out to use a pattern.
How to read crochet charts
There are a few factors to consider when attempting to use a crochet chart for the first time. You will need to understand which direction to read the chart from, identify which symbol represents which stitch, and how to tell if you need to use a special technique.
Understanding the basic stitch symbols
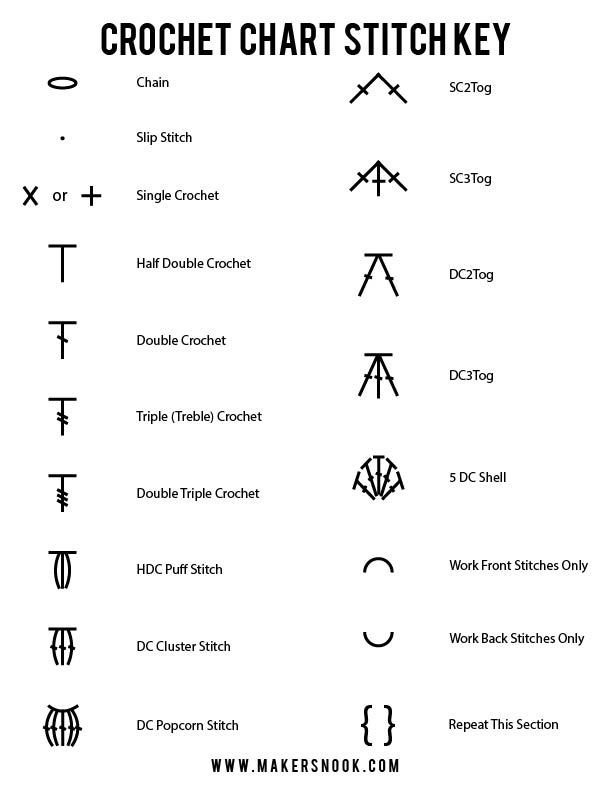
Many crochet charts come with a stitch key or legend to help you identify each symbol used in the chart. However, some do not, so it is helpful to be able to identify them on your own.
The basic stitches are as follows:
- Chain stitch (ch): the chain stitch is usually represented by a sideways oval. Due to the foundational nature of the chain stitch, you are most likely to find several of them next to each other at the bottom of the chart, but they are also common throughout patterns with lace or shell designs.
- Slip stitch (sl): a slip stitch is represented by a filled circle (or dot).
- Single crochet (sc): the single crochet stitch is often depicted on charts as an X or + symbol. Each symbol represents one stitch, so if a chart has several single crochet symbols in a row, it is telling you to make that many single crochet stitches.
- Half double crochet (hdc): a half double crochet stitch is represented on most charts as a T shape.
- Double crochet (dc): a double crochet stitch is also a T shape, but it has a single slash through the vertical line of the T.
- Triple crochet (tc): a triple crochet stitch (also referred to as a treble stitch) is represented by a T shape with two slashes through the body of the T.
- Double triple crochet (dtc): a double triple (or treble) crochet stitch is represented by a T shape with three slashes through the body of the T.
The horizontal slash lines in the last three stitches indicate the number of yarn overs needed to make each type of stitch. If you forget which symbol is which, you can use the yarn over lines to guide you while crocheting.
Understanding puff, popcorn, bobble, and cluster stitch symbols
The puff, popcorn, bobble, and cluster stitches all require crocheting through the same base stitch several times. They do not increase the number of stitches in the row because they are all stitched together at the top to make a single wide (or protruding) stitch.
The extra stitches are represented as curved lines on either side of a basic stitch symbol. The number of curved lines tells you how many extra stitches are required for each stitch.
For example, a popcorn stitch requires five double crochet stitches worked into one base stitch.
To represent that on a crochet chart, the double crochet symbol would have four curved lines – two on each side – of the DC symbol. This results in a total of five lines (four curved lines and the straight line of the original DC symbol) to signify each individual DC stitch that you would work into the base stitch.
A cluster stitch of three half double crochets would be represented on a chart as a half double crochet symbol with one curved line on each side.
These stitches can vary significantly depending on whether they are made with half double, double, or triple crochets and how many stitches are being worked into a single bottom stitch. However, as long as you count the number of curved lines and pay attention to which symbol they are attached to, you should be able to understand any variation you see on a crochet chart.
Understanding the symbols for combined stitches
Decrease stitches (meant to decrease the number of stitches in a row by crocheting multiple stitches together) like SC2TOG or DC3TOG also have their own set of symbols on a chart.
When representing that a certain number of stitches need to be stitched together, crochet charts typically place slanted lines together to form an upward-pointing arrow. They incorporate part of the basic stitch symbol to show what kind of stitches are being combined.
Some examples of this would be:
- SC2TOG (single crochet 2 together): is represented by two lines slanted together to make an arrow shape. Each line also has a dash through them near the middle to signify that they are single crochets.
- SC3TOG (single crochet 3 together): adds a third line in the middle of the SC2TOG symbol to signify an extra stitch is being combined.
- DC2TOG (double crochet 2 together): adds a horizontal line to the top of a SC2TOG to resemble the T shape of the DC symbol.
- DC3TOG (double crochet 2 together): looks like the basic DC symbol with a slanted line on either side.
- TC2TOG (triple crochet 2 together): looks the same as a DC2TOG, except each line has two slashes through it instead of one to signify the larger amount of yarn overs to make the stitch.
And so on. You will see many variations with different stitches (and different numbers of stitches being combined). As long as you remember the characteristics of the basic stitch symbol, such as the number of slashes used on the different DC stitches, you should be able to easily interpret any combined stitch symbol you encounter.
Understanding the shell stitch patterns
Shell stitches, like cluster stitches, require several stitches to be worked into one base stitch. The main difference between the two is that a shell stitch fans out at the top to resemble a seashell instead of clumping together in one spot like the cluster and bobble stitches.
Shell stitches are fairly easy to read on a crochet chart. They are typically represented by several basic stitch symbols clustered together. The symbols connect at the bottom and fan out at the top, much like the finished stitch does.
For example, a shell stitch made of 5 double crochets would show up on the chart as 5 double crochet symbols grouped into one base stitch.
The exact appearance of the shell stitch symbol will vary depending on which basic stitch is being used, and how many stitches the shell is made from.
Other symbols to consider
Crochet charts use a few more symbols for signifying miscellaneous techniques.
- Back stitches only: some stitches will have a U shape above them to signify they are worked through the back loops only.
- Front stitches only: some stitches will have an upside-down U shape above them if they are to be worked through the front loops only.
- Brackets: if a certain part of the pattern is enclosed in brackets, that part of the pattern is meant to be repeated a certain number of times or until the project reaches a certain length. You would need to reference the written instructions for clarification.
- Colors: some crochet charts will have a color guide if the pattern is meant to be worked in intarsia to produce a multi-colored pattern.
Basically, whatever color the stitch is on the chart is the yarn color you should use.
Understanding which direction to read the chart from
Crochet charts are almost always started from the bottom right corner.
Each row is worked from a different side, so if you worked right to left on row 1, you would work left to right on row 2.
Sometimes a crochet chart will have an arrow to tell you where to start and where to end, but that often is not the case.
If the chart is meant to be crocheted in the round, you would start from the middle and work your way outward.
Occasionally a crochet chart will have numbers on the bottom and one side of the chart to help you count and keep track of the number of stitches and rows. It also helps you discern in which direction the pattern begins because the first stitch will be labelled as stitch #1.
However, this practice is much more common in knitting charts and is not reliable for crochet.
Tips for using crochet charts
There are a few basic practices that can make working with crochet charts much easier.
Read the symbols out loud
Read the symbols aloud as you are crocheting. This will force you to acknowledge which stitch or technique is being called on and you will be much less likely to make mistakes.
Remember, most of the basic stitches look very similar, so it is easy to miscount or misjudge the yarn over lines when you are just skimming the chart.
Check the pattern key
If your pattern comes with a legend for all the symbols used on the chart, make sure you pay close attention to it.
The list of symbols given in this guide is fairly comprehensive, but some charts will use more obscure symbols, use an uncommon variation of the ones listed in this guide, or make their own if the techniques needed for the project are advanced.
If your pattern does not have a legend you can use a crochet stitch key below as a reference.
Print out your charts before you use them
If you are using a chart you found online, it is a good idea to print out the chart (and the written instructions, come to think of it!) before you begin. Having the chart right in front of you will make it easier to follow along.
Technology is also not always conducive to this type of work. Sleep modes, idling screens, constant notifications, and even system crashes can all slow down your work or make you forget your place.
Plus, printing off your chart leaves your phone or PC free to use, so you can look up any stitches or techniques you are not familiar with, without having to navigate out of your chart or instructions.
Learn the basics of crochet first
Crochet charts are not good for crochet beginners. It is much harder to remember the meaning of each symbol when you don’t even know how to do the technique it represents.
Be sure you know how to make all of the stitches and how to do things like increase or decrease stitches before you jump into using charts.
You will most often encounter charts for more advanced projects anyway, so if you are not proficient in the basics of crochet, the project will most likely be beyond your skills anyway.
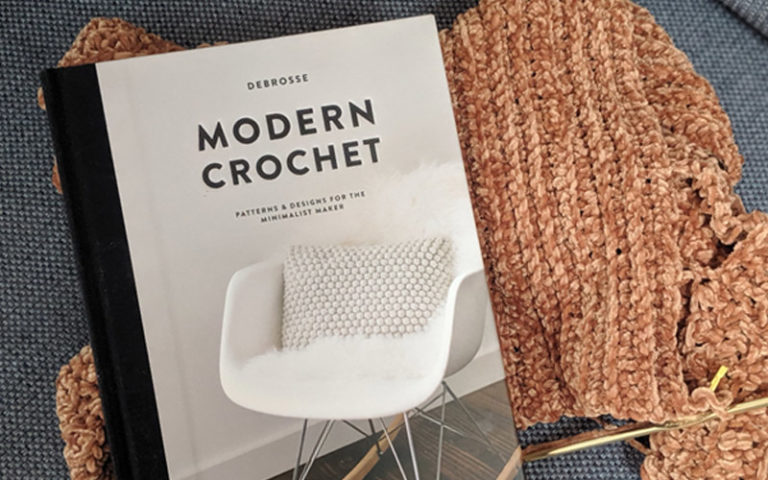
If you’d like to master the crochet craft we have a whole post dedicated to the best crochet books that can be useful to both beginners and advanced crocheters.
Wrapping it up
Well, there you go! We’ve covered everything you need to know about crochet charts, including what they are, what they are used for, and how to read them.
If you found this guide useful, or if you have any tips you think we should include – leave us a comment below! And, as always, feel free to share this page with your friends.